Getting Started
The Copytalker is an isolated web component which allows Copytalk subscribers to create recordings through a web browser. As a host of a Copytalker button, you provide your web users with the added convenience of creating dictations while never having to leave your website. The only technical knowledge required to embed a Copytalker button into your website is a basic understanding of HTML and Javascript. This document provides a walk through of both how to embed a Copytalker button into your website as well as what’s going on under the hood of the Copytalker button.
After a quick look at supporter browsers and dependencies, we'll jump right into the embedding process.
The Copytalker leverages the Web Audio API. As such, the button can be used in any modern browser that supports the Web Audio API. This excludes all versions of Internet Explorer. The following browsers versions have explicit verified compatibility:
- Chrome 68.0.3440.106
- Firefox 61.0.2
- Microsoft Edge 42.17134.1.0
- Opera 55.0.2994.44
- Safari 11.1.2 (iOS 11.4.1) Previewing audio is disabled on iPhone and iPad
The Copytalker leverages the Web Storage API. The button will not function if session storage is unavailable.
The Copytalker is not supported on third party browsers on the iPhone or iPad platforms.
The Copytalker button is a completely front end driven component. In this section of the tutorial, we're just going to focus on the basics of embedding the button. Later on we'll get into the details of how the button functions. To start, we need to add a script reference to the current Copytalker javascript file. The code snippet below is step number 1.
<script src="https://download.copytalk.com/copytalker/copytalkerbutton.min.js" class="ct-btn-script"></script>Note: If you would like to direct the Copytalker to our staging environment, be sure to add the following attributes to the script tag:
data-target='stage' class="ct-btn-script" and use a valid api key.
Next, we need to place an anchor tag somewhere on the page and give that anchor tag the appropriate class. During the initialization process, that anchor tag will be converted into an instance of the button. An example follows:
<a class="copytalker"></a>
At this point, we've given your page enough information to create an instance of the button. It knows what the button is and where to place it. The next step is to have your page fire up an instance of the button. This is done with a few lines of javascript code. Add another script element and toss in the following code:
Note: We'll get into more detail about what's going on in this code later in the tutorial.
    var recorder = new CtRecorder(
    {
        context: { "examplecontext": "This is from a tutorial." },
        apiKey: '5968d1e9-f54b-48bf-b822-df676d4af9be',
        esotericUserId: 'externalidentifier@yourwebsite.com',
        userToken: '9f82077f-66ee-4e3d-946d-f6a3c6119f4f'
    }
        , function (recorder) {
            if (recorder) {
                recorder.init();
                /*Additional code here*/
            }
            else {
                console.err("Failed to create Copytalker.");
            }
    });
With these three steps completed, you have prepared your page to initialize a Copytalker button. When your page is refreshed, you should now see the Copytalk button rendered on your page.
In the next section of this tutorial, we'll dissect the parameters being passed to the constructor of the Copytalk button.
Note: You will not be able to use the button to record and send dictations just yet. Your domain must first be white listed against the user token used to initialize the button. This process is covered more thoroughly later in the tutorial.
The Copytalkerconstructor takes two arguments, a configuration object and a callback to execute upon instantiation. In the example above, the configuration object passed was as follows:
    {
    context: { "examplecontext": "This is from a tutorial." },
    apiKey: '5968d1e9-f54b-48bf-b822-df676d4af9be',
    esotericUserId: 'externalidentifier@yourwebsite.com',
    userToken: '9f82077f-66ee-4e3d-946d-f6a3c6119f4f'
    }
Let's took a look at this object first, highlighting the critical properties it will need to expose.
apiKey- This key is created and administered by Copytalk. Each integration partner looking to host the button will be given their own unique api key.esotericUserId- This identifier is necessary for creating and retrieving a user token. It should be a unique identifier for each user you wish to expose the Copytalker button to.userToken[optional] - A user token is an obfuscation of a Copytalk subscriber customer identifier. The user token is used to associate any uploaded dictations with an active Copytalk account. User tokens are automatically created the first time a user uses the Copytalker on your domain. You can persist the user token in your database for future usage.context[optional] - This is an optional JSON object which can be used to provide more context for the uploaded dictation. An example of how context may be used is to inform Copytalk that the uploaded dictation is part of a back end integration work flow.
The second argument of the Copytalker constructor is a callback function which will be called after successful instantiation of the button. In the example we're using, the callback is as follows:
    function (recorder) {
        if (recorder) {
        recorder.init();
        /*Additional code here*/
        }
        else {
        console.err("Failed to create Copytalker.");
    }
The function will receive a reference to the newly created Copytalker. If anything went wrong during the instantiation process, that reference will be corrupt. So, the callback function first checks to make sure the instance is valid. If that check is passed, the function calls the recorder's init function. The init function prompts the button to be rendered on the page and readies it for use. If that check fails, an error message is written to the console.
This function is completely customizable. Just make sure to remember to call the recorder's init function at some point within the callback.
A Deeper Look
The Copytalker was designed to be easy to quickly add to any website. It not only takes care of the heavy lifting of processing audio through a user interface, it streamlines user authentication and registration. In order for a user to create and upload dictations, the Copytalker must know which integration partner is hosting the button as well as which Copytalk subscriber the button instance belongs to.
In the example given earlier, you saw a few configuration properties that can be exposed and passed to the Copytalker's constructor. In the next few sections of this tutorial, we'll cover the various user experiences that result from passing varied combinations of constructor configuration properties.
The first user experience we'll examine is one where you as the host of the Copytalker can provide a valid user token. This is the most seamless of the user experiences as it requires no additional authentication from your end user. The following is an example of how to instantiate the Copytalker with a previously validated user token:
    var recorder = new CtRecorder(
    {
    apiKey: '5968d1e9-f54b-48bf-b822-df676d4af9be',
    esotericUserId: 'externalidentifier@yourwebsite.com',
    userToken: '9f82077f-66ee-4e3d-946d-f6a3c6119f4f'
    }
    , ...
You should notice a few differences from our initial example. First, we've excluded the callback function just to save space in the tutorial. More importantly, the optional context property was not included in the configuration object.
This configuration prepares the button for immediate use.
Note: If your user has never used the button from your domain, the user will be prompted to white list your domain by logging into their Copytalk account.
The next user experience we'll examine is one where you can not provide a valid user token. An example follows:
    var recorder = new CtRecorder(
    {
    apiKey: '5968d1e9-f54b-48bf-b822-df676d4af9be',
    esotericUserId: 'externalidentifier@yourwebsite.com'
    }
    , ...
This configuration will appropriately render the button. Once your users clicks the button, they will be prompted to either log into an existing Copytalk account or become a Copytalk subscriber. A successful login or registration of a new Copytalk account will return a user token, as well as white listing of the domain which originated the request. The user will then be able to create and upload dictations through the Copytalker.
In this section we'll dive deeper into how the button secures itself from misuse, both accidental and malicious.
The Copytalker requires a number of validation factors to be present simultaneously in order to create and upload dictations. First, the api key and user token must be present and valid. A user token may be deemed invalid for a variety of reasons such as:
- The associated Copytalk account is not active.
- The associated Copytalk account is in a failed billing state.
- The user token was forged.
Advanced
Any time a user logs into their Copytalk account via the button, a user token is returned. You can use the onlogInRegisterComplete property of the configuration object to provide a callback function to be called after successful log in or registration. The function you provide will be passed the acquired user token. An example follows:
    var recorder = new CtRecorder(
    {
    context: { "examplecontext": "This is from a tutorial." },
    apiKey: '5968d1e9-f54b-48bf-b822-df676d4af9be',
    esotericUserId: 'externalidentifier@yourwebsite.com',
    userToken: '9f82077f-66ee-4e3d-946d-f6a3c6119f4f',
    onlogInRegisterComplete: function (e) {
        console.log("Received user token", e);
        }
    }
    , ...
The context property of the configuration object passed to the Copytalker constructor can be used to provide additional information relative to the dictations created and uploaded through the button. This property is a plain JSON object. The most common use of the context property is to provide Copytalk with information to use when delivering a transcript. This allows for deeper back end integration and automation during the transcript delivery process.
Let's use the following scenario as example. Let's assume your website is a CRM and your user is dictating notes from an annual review with a client contact. At the end of the transcription workflow, you want to archive the dictation content by creating a note under that contact's profile. You could make Copytalk aware of this intent through the context object like so:
{"clientcontactid":"8gbn489f0d","actiontype":"createnote"}Note that to truly make use of back end automation, you'll need to work with our developers. They will need to write code to interpret and appropriately handle the context passed. Contact the Copytalker development team at copytalkerteam@copytalk.com for more information.
End-to-end Integration
The Copytalker is designed to facilitate end-to-end integration. This means the transcription content of audio uploaded by the Copytalker can be returned in a variety of ways simply by exposing certain properties within the context object. The following is a walkthrough of how to utilize our generic transcription return workflow.
Below is a template for the context object:
{
    //The api endpoint address which Copytalk will send transcription information back to.
    "callback": /*url endpoint*/
    //Information necessary for constructing a web request against the provided endpoint.
    ,"requestData":
        {
            "authorization":/*Bearer or Basic*/
            ,"token":/*an authorized token*/
            ,"method":/*POST or PUT*/
        }
    //Optional additional information you may use when handling Copytalk's returned transcription content.
    [,optional additional properties
    ]
}
The generic transcription return workflow requires the following properties:
callback- The url to which to send the HTTP request which packages the transcription content.requestData- An object specifying the authorization type and token which will be added as an Authorization HTTP header, and the http method.
These two properties are required for our generic return workflow.
Copytalk will include the entirety of the original context object within the request sent. So, you can expose any properties in the context that may be useful when the transcription content is returned.
Below is the JSON object structure of what Copytalk will send to your callback url:
{
    "Copytalk":
        {
            "Transcript":
                {
                    "Created":[timestamp]
                    ,"Subject":[subject (if specified)]
                    ,"Text" :[text]
                }
            ,"Context":[original context object provided]
    }
}
Let's use the following scenario as example. Let's assume your website is a CRM and your user is dictating notes from an annual review with a client contact. At the end of the transcription workflow, you want to archive the dictation content by creating a note under that contact's profile. You could make Copytalk aware of this intent through the context object like so:
{
    "callback": "https://mycrm.com/api/contact/194/createnote"
    //194 is the contact's unique ID
    ,"requestData":
        {
            "authorization":"Bearer"
            ,"token":"tu959+ewtwegkjh54rWRCgrge566fdfsdfFxmKeeYYg="
            ,"method":"POST"
        }
    ,"internalContext":
        {
            "source":"Copytalker Tutorial"
            ,"followup":"Create Activity Record"
            ,"contactid":"194"
        }
}
The resulting JSON object returned from Copytalk once the transcription process is completed would look something like the following:
{
 "Copytalk":
            {
            "Transcript":
                {
                    "Created":"2019-04-23 15:38:32"
                    ,"Subject":"Annual Review Meeting"
                    ,"Text" :"Met with Mark on April 23rd"[...]
                }
            ,"Context":
                {
                    "callback": "https://mycrm.com/api/contact/194/createnote"
                    ,"requestData":
                    {
                        "authorization":"Bearer"
                        ,"token":"tu959+ewtwegkjh54rWRCgrge566fdfsdfFxmKeeYYg="
                        ,"method":"POST"
                        }
                    ,"internalContext":
                    {
                        "source":"Copytalker Tutorial"
                        ,"followup":"Create Activity Record"
                        ,"contactid":"194"
                    }
                }
       }
}
The following shows an example of the raw HTTP request
POST /api/contact/194/createnote HTTP/1.1
Host: mycrm.com
Authorization: Bearer tu959+ewtwegkjh54rWRCgrge566fdfsdfFxmKeeYYg=
Content-Type: application/json
Cache-Control: no-cache


{"Copytalk":{
    "Transcript":
    {
        "Created":"2019-04-23 15:38:32"
        ,"Subject":"Annual Review Meeting"
        ,"Text" :"Met with Mark on April 23rd"
    }
    ,"Context":
    {
        "callback": "https://mycrm.com/api/contact/194/createnote"
        ,"requestData":
        {
            "Authorization":"Bearer"
            ,"token":"tu959+ewtwegkjh54rWRCgrge566fdfsdfFxmKeeYYg="
            ,"method":"POST"
            }
        ,"originalContext":
        {
            "source":"Copytalker Tutorial"
            ,"userid":"Create Activity Record"
            ,"objectid":"194"
        }
    }
 }
}
Note, the above is simply an example of how to use the generic transcription workflow we've provided. Any custom workflow can be developed in coordination with the Copytalk development team. For more information on customizing workflow, contact the Copytalker development team at copytalkerteam@copytalk.com.
There are a number of callbacks you can provide to in order to have your UI update based on various events from the button. The callbacks are added as properties to the configuration object passed to the Copytalker constructor. The syntax and behavior for these callbacks are as follows:
| Property Name | Arguments | Usage |
|---|---|---|
onAudioSent: function(e){} |
e - An object representation of the created Copytalk dictation. | Raised when an audio file has been successfully uploaded for transcription. |
onAudioErr: function(e){} |
e - An error object. | Raised on a failed attempt to upload audio for transcription. |
onBeginAudioSend: function(){} |
None | Raised when a dictation is sent to Copytalk for transcription. |
onMessage:function(e){} |
e - A string message from the button. | Primarily used as the default UI alert for various button events. |
onlogInRegisterComplete: function (e){}
|
e - The user token. | Raised after successful log in to a Copytalk as well as a successful new subscriber registration. |
Any and all of the UI elements utilized by the Copytalker can be overridden to allow for complete customization of UI experience. You can override elements by tagging your HTML elements with specific class attributes.
The return value of the init() method used to initialize a Copytalker button will return an object with all of the relevant HTML entities that comprise the Copytalker UI.
The following table outlines the various UI elements utilized by Copytalker, as well as the necessary class name that must be provided to override them. Following the table is a visual diagram of the individual components.
| Element Name | Class Override | Acceptable HTML Elements | Description | |
|---|---|---|---|---|
| Record Button | "ctr-record" |
any | When clicked, this element initiates the recording sequence or prompts a user to log in/register for the Copytalk service - depending on whether the user has been authenticated or not. | |
| Pause Button | "ctr-pause" |
any | When clicked, this element will cause the Copytalker to pause recording. | |
| Send Button | "ctr-send" |
any | When clicked, this element will cause the Copytalker to send its most recent recording to Copytalk for transcription. | |
| Discard Button | "ctr-discard" |
any | When clicked, this element will discard the most recent recording. | |
| Stop Button | "ctr-stop" |
any | When clicked, ceases recording. | |
| Preview Button | "ctr-preview" |
anchor | When clicked, downloads a copy of the most recent recording to the user's client machine. | |
| Working Element | "ctr-working" |
any | This element is shown when the Copytalker is working on some process which has suspended the UI. For example, when a user elects to send a recording to Copytalk for transcription. | |
| If any of the below are overridden, they must all be overridden. | ||||
| Recording Timer | "ctr-timer" |
any | This element holds a running timer while the Copytalker is recording. | |
| Recording Header | "ctr-header" |
any | This element displays only when the Copytalker is recording. | |
| Recording Message | "ctr-message" |
any | This element displays messages to the users which describe a process Copytalker is currently undergoing. | |
Images of UI components
Note: Not all elements are labeled. The discard, preview and stop buttons can be discerned from the images.
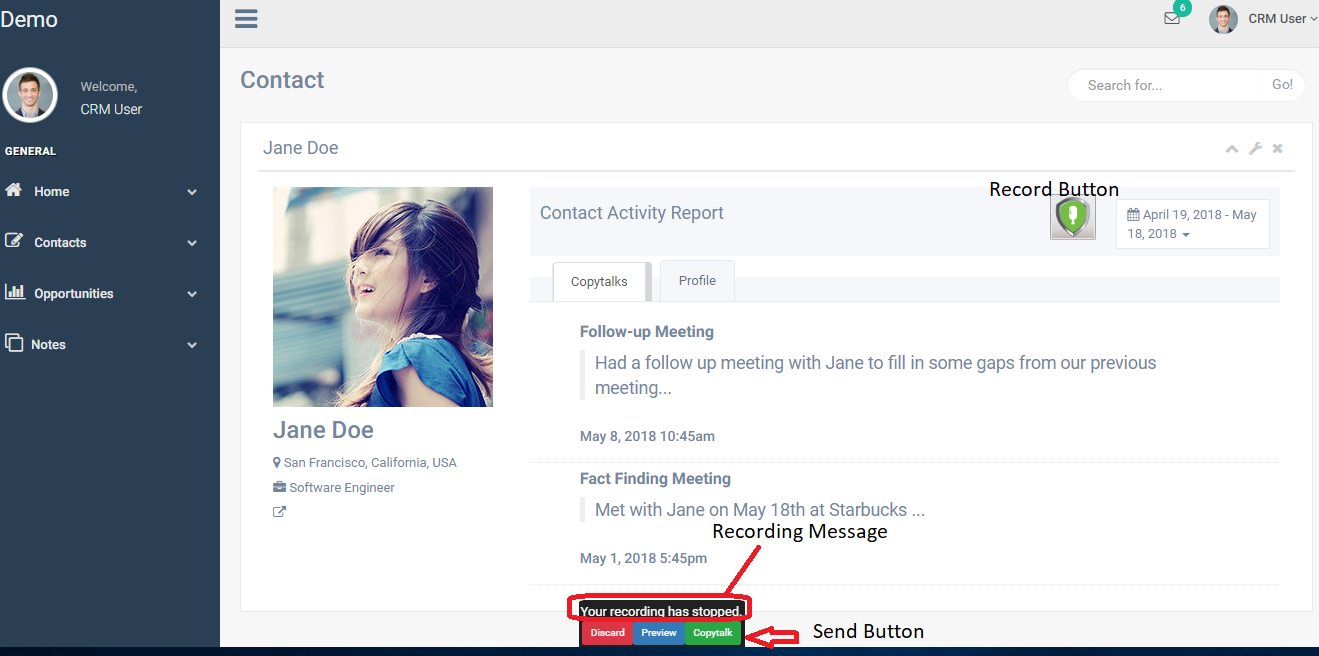

Example using class attributes
The following code snippet serves as an example of how to appropriately tag HTML elements with the Copytalker classes in order to override the default UI. This code snippet uses Bootstrap and Font Awesome icons. You can preview a live version of this here.
<div class="col-md-5">
    <div class="pull-right">
        <br/>
        <div  class="" style="text-align:center;"  role="alert">
            <p class="label label-default ctr-timer">
            </p>
            <p class="label label-warning ctr-message"></p>
            <div style="font-size:24px;" >
                <i class="fa fa-microphone  ctr-record" title="Record"></i>
                <i class="fa fa-trash  ctr-discard" title="Discard"></i>
                <i class="fa fa-stop-circle  ctr-stop"  title="Stop"></i>
                <a class="ctr-preview"><i class="fa fa-headphones-alt " title="Preview" ></i></a>
                <i class="fa fa-pause ctr-pause" title="Pause"></i>
                <i class="fa fa-user-tie  ctr-send" tite="Send"></i>
                <i class="fa fa-sign-out-alt  ctr-logout"  title="Log out of Copytalker" hidden></i>
            </div>
            <p  class="label label-primary ctr-header">
                Recording Powered By Copytalk
        </p>
        <div class="ctr-working loader"></div>
        <style>
            .loader {
                border: 16px solid black;
                border-radius: 50%;
                border-top: 16px solid green;
                width: 20px;
                height: 20px;
                -webkit-animation: spin 1s linear infinite; /* Safari */
                animation: spin 1s linear infinite;
            }

            /* Safari */
            @-webkit-keyframes spin {
                0% { -webkit-transform: rotate(0deg); }
                100% { -webkit-transform: rotate(360deg); }
            }

            @keyframes spin {
                0% { transform: rotate(0deg); }
                100% { transform: rotate(360deg); }
            }
            </style>
        </div>
    </div>
</div>
Example using an object reference
The following code snippet shows the proper syntax for overriding the default Copytalker UI by passing an object to the init method. Notice that the elements are found via the document.getElementsByClassName method. This is for two reasons. One, any existing ID attributes that you have given to your elements will be overwritten. Two, each property within the object passed must be a primitive HTML element type as defined by the browser (and not a jQuery object, for example).
var recorder = new CtRecorder(
{
    ...abbreviated...

}, function (recorder) {
    if (recorder) {
        var htmlOverrides =  {

                logOutBtn:   document.getElementsByClassName('ctr-logout')[0],
                stopBtn:  document.getElementsByClassName('ctr-stop')[0],
                discardBtn: document.getElementsByClassName('ctr-discard')[0],
                previewBtn:  document.getElementsByClassName('ctr-preview')[0],
                sendBtn:  document.getElementsByClassName('ctr-send')[0],
                recordBtn:  document.getElementsByClassName('ctr-record')[0],
                recordingTimer:  document.getElementsByClassName('ctr-timer')[0],
                recordingMessage: document.getElementsByClassName('ctr-message')[0],
                recordingHeader: document.getElementsByClassName('ctr-header')[0],
                workingElem: document.getElementsByClassName('ctr-working')[0],

            };
        var htmlElements = recorder.init(htmlOverrides);
        console.log(htmlElements);